Literature often sparks a desire to capture the essence of stories through art. What better way to start than by learning how to draw a book? Illustrating literature allows us to bring our favorite tales to life in a new and creative dimension.
In this artistic guide, we’ll unravel the steps to draw a captivating book, offering a delightful blend of imagination and visual storytelling.
Table of contents
What materials do I need to draw a book?
Drawing a book is a delightful artistic endeavor that requires minimal materials. Here’s what you need:
Paper:
Choose a sheet of paper suitable for drawing. You can opt for plain white paper or experiment with colored paper to add a creative touch.
Pencil:
A pencil is an excellent tool for initial sketches. It allows you to outline and make adjustments before adding more permanent details.
Eraser:
An eraser comes in handy for refining your drawing. It allows you to correct mistakes and achieve clean lines, especially when working on the details.
Pens, Colored Pencils, or Markers (Optional):
Once you’re satisfied with your pencil sketch, you can add details, color, or even experiment with different artistic elements using pens, colored pencils, or markers.
Reference Images (Optional):
If you want to add specific details to your drawn book, having reference images of actual book covers, titles, or other elements can be helpful for accuracy.
See also: What Age Do You Graduate High School?
How to Draw a Book?
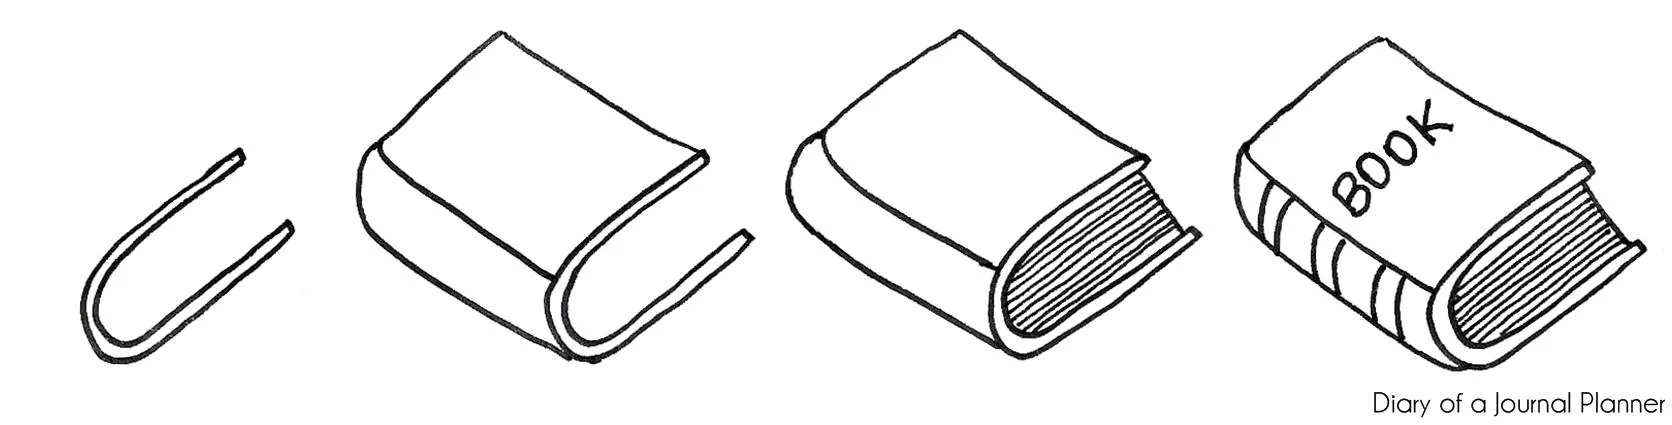
Step 1: Draw the Book Cover
Begin by drawing a rectangle for the book cover. This will be the front of your book. Add two vertical lines extending from the top and bottom of the rectangle to represent the spine.
Step 2: Create the Spine
Draw a rectangle connecting the top and bottom lines of the spine. This forms the spine of your book. Adjust the width of the spine based on your preference.
Step 3: Outline the Pages
Add horizontal lines inside the book cover to represent the pages. These lines should be parallel to the top and bottom edges of the book cover. The number of lines depends on the thickness of your book.
Step 4: Add Details to the Cover
Get creative with the cover design. Draw a title, author’s name, or any decorative elements you like. You can also experiment with different shapes or patterns to make your book unique.
Step 5: Refine and Add Shadows (Optional)
Refine your lines and add shadows to give your book a three-dimensional look. Shade one side of the book cover and the spine to create the illusion of depth.
Step 6: Personalize Your Book (Optional)
Personalize your book by adding your favorite title, a unique cover design, or even a small illustration on the cover. This is where you can let your creativity shine.
Step 7: Finalize Your Drawing
Go over your drawing, making any necessary adjustments. Add finer details and ensure that your lines are clean. Erase any unnecessary guidelines.
Step 8: Color Your Drawing (Optional)
If you’re using colored pencils, markers, or other coloring tools, add color to your drawing. Consider the color of the book cover and any additional details you’ve included.
Step 9: Enjoy Your Drawn Book!
Step back and admire your creation. You’ve successfully drawn a book! Feel free to experiment with different styles and details to make each book illustration uniquely yours.
Remember, the key is to have fun and let your imagination guide your drawing. Happy illustrating!
Read also: Which Group is a Primary Supporter of Hunter Education?
Conclusion
Drawing a book is not just about creating an image; it’s about translating the magic of literature into a visual form. As you draw, let your imagination guide your pencil, and allow the pages of your drawn book to unfold with the same enchantment as the stories that inspired them.
Frequently Asked Questions
Absolutely! This guide is designed for all skill levels. Whether you’re a seasoned artist or picking up a pencil for the first time, you can follow these simple steps to draw a charming book illustration.
All you need is paper and your favorite drawing tools. A pencil is a great choice for initial sketches, and you can add details with pens, colored pencils, or markers. Feel free to experiment with different materials.
Of course! This is your artistic journey. Once you’ve mastered the basic steps, let your creativity shine by adding your favorite book title or designing a custom cover. Make it uniquely yours.
While this guide provides basic proportions, feel free to get creative with the size and shape of your drawn book. Experiment with different proportions to suit your artistic vision and style.
Absolutely! Pay attention to shading, highlights, and texture details. You can add a subtle shadow beneath the book, create depth with shading on the cover, and even draw small details like a bookmark or worn edges for a realistic touch.
References
- ingramspark.com– how to draw a book
- thamesandhudson.com– how to draw a book- a complete guide