Dolphins, the graceful and playful inhabitants of the ocean, have long captivated our imaginations.
Their sleek bodies, mischievous smiles, and agile movements have inspired countless artists and storytellers.
If you’ve ever admired their beauty and wondered how to capture their essence on paper, this guide is for you.
Whether you’re a seasoned artist or a complete beginner, this step-by-step tutorial will equip you with the tools and techniques to create your own stunning dolphin drawings.
Table of contents
What do I need to draw a dolphin?
Pencil
Eraser
Paper
Blue, gray, or black marker or crayon
How to draw a dolphin
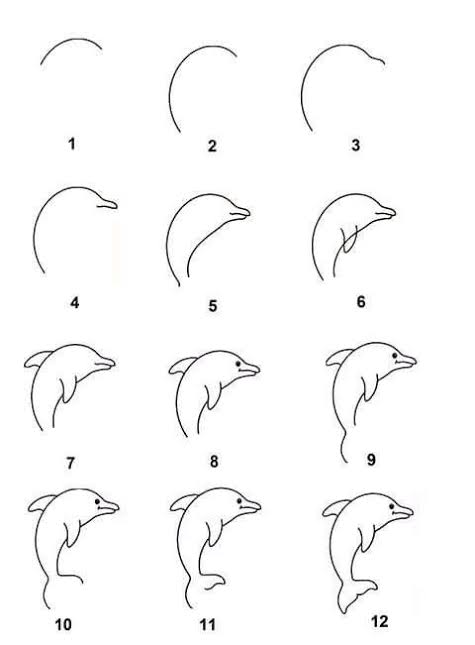
Here is a step-by-step guide on how to draw a dolphin:
Sketch the head and body:
Start by drawing a circle for the head and a slightly larger oval for the body.
Position the circle slightly above the oval, overlapping it slightly.
Shape the snout:
Draw a curved line extending downward from the circle to form the dolphin’s snout.
Make it slightly pointed at the end.
Add the dorsal fin:
Draw a curved line starting from the back of the oval and extending upwards. Make it slightly wavy along its length.
Draw the flippers:
Draw two curved lines extending outwards from the sides of the body near the head. These represent the dolphin’s flippers.
Outline the tail:
Draw a V-shaped curve extending downwards from the back of the oval. This forms the dolphin’s tail.
Refine the details:
Use your eraser to clean up any unnecessary lines and refine the overall shape of the dolphin.
Add facial features:
Draw a small circle for the eye and a curved line for the smile.
Position the eye slightly above the middle of the snout and the smile near the bottom of the snout.
Outline with marker or crayon:
Choose a blue, gray, or black marker or crayon to outline the entire dolphin, following the refined sketch lines.
Add shading:
Use a darker shade of blue, gray, or black to add shading around the dolphin’s body, flippers, and tail.
This will give it a more three-dimensional appearance.
Color the body:
Use a lighter shade of blue, gray, or black to color the rest of the dolphin’s body.
Complete the drawing:
Once the coloring is finished, your dolphin drawing is complete!
Remember to practice regularly to improve your drawing skills and have fun creating your own dolphin masterpieces.
How to draw a dolphin face
Here’s a step-by-step guide on how to draw a dolphin face:
Start with a basic circle: Lightly sketch a circle to represent the dolphin’s head. This will serve as the foundation for the facial features.
Position the eye: Draw a small circle slightly above the center of the larger circle to represent the dolphin’s eye. Keep it slightly closer to the snout side.
Shape the snout: Extend a curved line downward from the circle, creating a pointed snout. Make it slightly wider at the base and taper it towards the end.
Add the mouth and smile: Draw a curved line extending from the base of the snout towards the center of the circle. This will form the mouth. Then, add a shorter, upward-curved line within the mouth to create the dolphin’s characteristic smile.
Refine the details: Use your eraser to clean up any unnecessary lines and refine the overall shape of the dolphin’s face. Ensure the features are symmetrical and balanced.
Outline with marker or crayon: Choose a blue, gray, or black marker or crayon to outline the dolphin’s face, following the refined sketch lines.
Add shading: Use a darker shade of blue, gray, or black to add subtle shading around the eye, snout, and mouth. This will give the dolphin’s face more depth and dimension.
Color the face: Use a lighter shade of blue, gray, or black to fill in the rest of the dolphin’s face. Keep the color consistent and avoid harsh lines.
Complete the drawing: Once the coloring is finished, your dolphin face drawing is complete!
How to Draw a Dolphin on Water
Drawing a dolphin on water requires a slightly different approach, as you’ll be capturing its movement and the interplay with the water’s surface.
Here’s a guide to drawing a dolphin emerging from the water:
Sketch the dolphin’s body: Start by drawing a curved line to represent the dolphin’s body, with one end emerging from the water and the other end submerged. Make the line slightly thicker at the center, representing the dolphin’s midsection.
Shape the snout and dorsal fin: Draw a curved line extending downwards from the emerging end of the dolphin’s body to form the snout. Make it slightly pointed at the end. Add a curved line extending upwards from the center of the body, creating the dorsal fin.
Outline the tail: Draw a V-shaped curve extending downwards from the submerged end of the body, representing the dolphin’s tail. Make it slightly wavy along its length to suggest movement.
Add water ripples: Draw short, curved lines around the dolphin’s body, extending outwards to represent the ripples caused by its movement in the water. Make the ripples more prominent near the emerging end and gradually fade as they move away from the dolphin.
Refine the details: Use your eraser to clean up any unnecessary lines and refine the overall shape of the dolphin and the water ripples.
Outline with marker or crayon: Choose a blue, gray, or black marker or crayon to outline the dolphin’s body and features, following the refined sketch lines.
Color the dolphin: Use a lighter shade of blue, gray, or black to fill in the dolphin’s body. Keep the color consistent and avoid harsh lines.
Color the water: Use a light blue or turquoise marker or crayon to color the water around the dolphin. Make it slightly darker near the dolphin’s body to suggest depth.
Complete the drawing: Once the coloring is finished, your drawing of a dolphin emerging from the water is complete!
Conclusion
Drawing a dolphin us not a walk in the pack. However, this guide has made it an easy feat.
Follow the steps above for the best dolphin you’ve ever drawn.
Recommendations
- How to Draw a Feet: Anatomical Illustration Skill
- How to Talk to Your Cat About Gun Safety: Humorous Pet Communication
- How Long Does Pre-Workout Last: Fitness Supplement Understanding
- How to Tell if Sinus Infection Has Spread to Brain: Health Risk Awareness
- How Long is a Score – Historical Time Understanding