Lions, the majestic kings of the jungle, have long captivated our imaginations with their powerful presence.
Capturing their essence in a drawing can be a challenging one. Whether you’re an experienced artist or a beginner, this step-by-step guide will equip you with the skills and techniques to bring a lion to life on paper.
Stay with us.
Table of contents
What do you need to Draw a Lion?
Pencils: HB for light outlines, 4B or 6B for darker shading.
Eraser
Drawing Paper: Smooth, medium-weight drawing paper for capturing the details of a lion’s fur and expression.
How to Draw a Lion
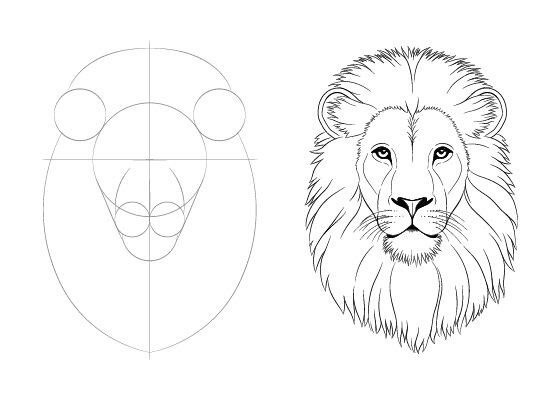
Step 1: Sketching the Basic Shapes
Start with the Body: Using a light pencil, sketch the lion’s elongated body, resembling a stretched rectangle. Position it diagonally across the paper to create a dynamic posture.
Shape the Head: Add a rounded oval for the head, slightly overlapping the body. This will form the lion’s majestic mane.
Form the Legs: Draw four angled lines extending from the body, representing the legs. Keep the lines slightly curved to suggest muscle definition.
Outline the Tail: Draw a long, flowing line extending from the back of the body, representing the lion’s powerful tail.
Step 2: Refining the Proportions
Refine the Body Shape: Use darker pencils to refine the body’s outline, adding subtle curves and indentations to suggest muscles and form.
Define the Head and Mane: Shape the head into a more rounded form, extending the mane around the face and neck. Use a lighter pencil to add subtle tufts of fur.
Thicken the Legs: Draw thicker lines over the initial leg outlines, giving them a more defined, muscular appearance.
Shape the Tail: Thicken the tail line, adding a slightly tapered end to suggest the tail’s natural shape.
Step 3: Adding Details and Shading
Eyes and Facial Features: Sketch the lion’s piercing eyes, using a darker pencil to define the irises and pupils. Add a small nose and mouth, giving the lion a subtle expression.
Mane Texture: Use a range of pencil grades to create depth and texture in the mane. Lighter pencils will highlight individual strands, while darker ones will create shadows and define the mane’s shape.
Fur Texture: Use short, quick strokes with a darker pencil to suggest fur markings and texture on the body, legs, and tail.
Shading and Dimension: Use varying pencil pressure to create shadows and highlights, adding depth and dimension to the lion’s form. Pay attention to the direction of light to create a realistic sense of form.
Step 4: Final Touches and Enhancements
Refine Details: Use a light eraser to remove any unwanted lines or smudges, ensuring a clean and polished final drawing.
Enhance Contrast: Go over the drawing with darker pencils to add depth and contrast, making the lion’s features stand out.
Background and Setting: If desired, add a simple background or setting to enhance the lion’s presence. Consider a grassy savanna or a rocky outcrop.
Signature and Date: Sign and date your artwork to add a personal touch and mark the completion of your lion portrait.
Conclusion
Drawing a lion requires patience, practice, and a keen eye for detail.
By following these step-by-step instructions and employing the techniques described, you can capture the essence of the king of beasts and bring your artistic vision to life.
Remember, drawing is a journey of continuous learning and experimentation. Embrace the process, enjoy the challenge, and let your creativity flourish.
Recommendations
- How to Draw a Feet: Anatomical Illustration Skill
- How to Talk to Your Cat About Gun Safety: Humorous Pet Communication
- How Long Does Pre-Workout Last: Fitness Supplement Understanding
- How to Tell if Sinus Infection Has Spread to Brain: Health Risk Awareness
- How Long is a Score – Historical Time Understanding