Naruto is one of the most popular anime and manga series of all time, and its characters are instantly recognizable and beloved by fans around the world. Naruto Uzumaki, the protagonist “Naruto,” is an iconic character known for his spiky blonde hair, orange jumpsuit, and signature headband.
Drawing Naruto can be a fun and rewarding experience, allowing you to bring this beloved character to life on paper.
How to Draw Naruto Step by Step
here is a step-by-step guide on how to draw Naruto:
- Start by lightly sketching out the basic shapes of Naruto’s head and body. This will help you to get the proportions of the drawing right.
- Once you have the basic shapes sketched out, you can start to add in the details. Start with the eyes, which are one of the most important features of Naruto’s face. The eyes should be large and expressive, and the irises should be a bright blue color.
- Next, add in the mouth, nose, and ears. The mouth should be wide and have a slightly mischievous grin. The nose should be small and pointed, and the ears should be large and round.
- Now you can start to add in the hair. Naruto’s hair is spiky and orange, so use a light pencil to sketch out the basic shape of the hair. Then, use a darker pencil to add in the details of the spikes.
- Once you’re happy with the hair, you can start to add in the clothes. Naruto’s clothes are pretty simple, so they shouldn’t be too difficult to draw. Just make sure to get the proportions right and to add in the details of the pockets, collar, and headband.
- Once you’re happy with the sketch, you can go over it with a black marker to make the lines more permanent. You can also use colored pencils or markers to add in some color.
Related Post: How Many Weeks Until Halloween (Countdown Timer and Updates)?
How to draw Naruto full body
Steps:
- Start by lightly sketching the basic shapes of Naruto’s body. This will help you to get the proportions right.
- Once you have the basic shapes sketched in, you can start to add more details. For example, you can add the muscles in Naruto’s arms and legs, as well as the folds in his clothing.
- Once you are happy with the details, you can go over the lines with a black marker or fineliner to make them stand out.
- If you want to, you can add color to your drawing. Naruto’s hair is blonde, his eyes are blue, and his outfit is orange.
How to draw Naruto characters
Drawing Naruto characters can be a fun and rewarding experience, whether you’re a beginner or a seasoned artist. With a little practice, you’ll be able to create your own renditions of your favorite characters from the popular anime and manga series.
Here are some tips on how to draw Naruto characters:
- Start with basic shapes. When you’re first starting out, it’s helpful to break down complex characters into basic shapes, such as circles, squares, and triangles. This will help you to understand the overall proportions of the character and make it easier to draw the details.
- Use reference photos. There are many great reference photos of Naruto characters available online and in books. Use these photos to help you get the details right, such as the shape of the characters’ eyes, noses, and mouths.
- Practice drawing facial expressions. Facial expressions are one of the most important aspects of drawing Naruto characters. Practice drawing a variety of expressions, such as happy, sad, angry, and surprised.
- Pay attention to the details. The details are what make Naruto characters so recognizable. Pay attention to the details, such as the characters’ hair, clothing, and accessories.
- Don’t be afraid to experiment. There is no right or wrong way to draw Naruto characters. Experiment with different styles and techniques until you find what works best for you.
Here are some step-by-step tutorials on how to draw some of the most popular Naruto characters:
Naruto Uzumaki:
Start by drawing a circle for the head.
Add two lines for the eyes and a line for the mouth.
Draw the hair, which is spiky and blonde.
Add the clothing, which is a blue ninja outfit.
Add the accessories, such as the forehead protector and the headband.
Sasuke Uchiha:
Start by drawing a circle for the head.
Add two lines for the eyes and a line for the mouth.
Draw the hair, which is black and spiky.
Add the clothing, which is a black ninja outfit.
Add the accessories, such as the forehead protector and the headband.
Sakura Haruno:
Start by drawing a circle for the head.
Add two lines for the eyes and a line for the mouth.
Draw the hair, which is long and pink.
Add the clothing, which is a red ninja outfit.
Add the accessories, such as the forehead protector and the headband.
Kakashi Hatake:
Start by drawing a circle for the head.
Add a mask for the face.
Draw the hair, which is silver and spiky.
Add the clothing, which is a green ninja outfit.
Add the accessories, such as the forehead protector and the headband.
These are just a few tips and tutorials to get you started. With practice, you’ll be able to draw your own amazing Naruto characters.
Related Post: What are Examples of Savory Foods? (25 Examples)
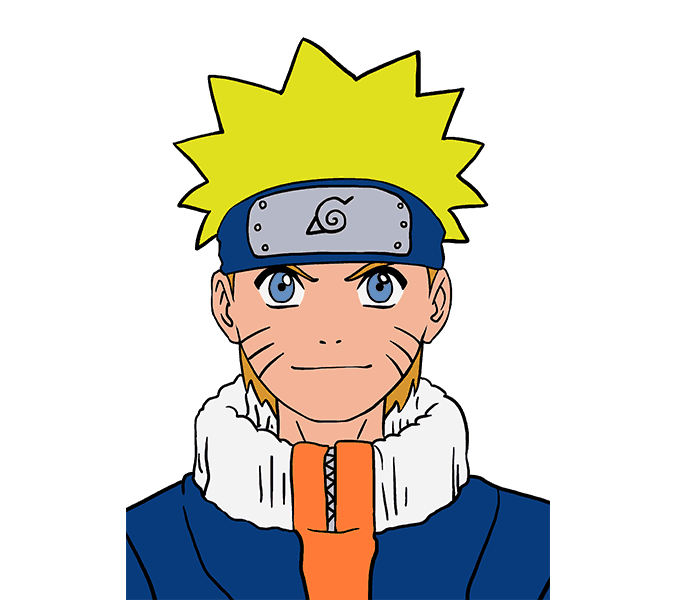
How to draw Naruto face
Here is a step-by-step guide on how to draw Naruto Uzumaki’s face:
- Start by drawing a circle for Naruto’s head. Then, draw two smaller circles for his eyes, making sure they are level with each other.
- Next, draw two triangles for Naruto’s eyebrows, with the points facing down. The eyebrows should be positioned above the eyes, with the left eyebrow slightly higher than the right.
- Draw a long, curved line for Naruto’s nose, starting from the top of his eyebrows and ending at the tip of his chin. The nose should be slightly curved to the right.
- Draw a small, curved line for Naruto’s mouth, starting at one corner of his mouth and ending at the other. The mouth should be slightly curved upwards.
- Draw two horizontal lines for Naruto’s whiskers, starting at the corners of his mouth and ending at the sides of his face. The whiskers should be slightly curved outwards.
- Draw Naruto’s hair. His hair is spiky and stands up on end. You can use a variety of lines to create the spiky texture.
- Finally, draw Naruto’s headband. The headband is a thin, black band with a metal leaf symbol in the center. The headband should be positioned across Naruto’s forehead, covering his left eye.
- Color Naruto’s face. Naruto’s skin is tanned, his hair is blonde, his eyes are blue, and his headband is black.
- Add details to Naruto’s face, such as wrinkles and shading. This will help to make your drawing look more realistic.
- Sign your name and date your drawing.
Here are some additional tips for drawing Naruto’s face:
Use light pencil strokes at first so that you can easily erase mistakes.
Use reference images of Naruto to help you get the proportions and details correct.
Practice drawing Naruto’s face often to improve your skills.
Related Post: Is the Sandlot Based on a True Story? (Explained)
How do you draw Naruto pencil sketch?
Here is a step-by-step guide on how to draw Naruto pencil sketch:
- Gather your materials. You will need a pencil, paper, and an eraser.
- Sketch a light circle for Naruto’s head. Make sure the circle is centered on the paper.
- Draw a line down the center of the circle to divide it in half. This will help you keep the proportions of Naruto’s face accurate.
- Sketch two smaller circles for Naruto’s eyes. Place the eyes on either side of the center line, slightly above the middle of the circle.
- Draw two short lines for Naruto’s eyebrows. Place the eyebrows above the eyes, angled slightly upwards.
- Draw a curved line for Naruto’s mouth. Place the mouth below the nose and above the chin.
- Sketch two lines for Naruto’s ears. Place the ears on either side of the head, slightly below the eyes.
- Outline Naruto’s hair. Naruto’s hair is spiky and stands up on end. You can use short, choppy lines to create this effect.
- Add details to Naruto’s face. This includes drawing his whisker lines, adding pupils to his eyes, and adding shading to his lips and eyebrows.
- Erase any unnecessary lines. Once you are satisfied with your sketch, erase any unnecessary lines.
- Go over your sketch with a darker pencil to add depth and definition.
- Add shading to Naruto’s hair and clothes. This will help to make the drawing look more three-dimensional.
Related Post: What Does KMS Mean on Snapchat?
Drawing Naruto Characters: Tips and Tricks for Aspiring Artists
If you’re an aspiring artist who wants to learn how to draw Naruto characters, there are a few things you can keep in mind to make the process easier and more enjoyable.
Understand the Anime Style
The first thing you need to do is understand the basic style of Naruto anime. The characters are typically drawn with large, expressive eyes, sharp facial features, and spiky hair.
The bodies are often slender and athletic, with exaggerated proportions. Once you have a good grasp of the style, you can start to break down the characters into basic shapes.
Start with Basic Shapes
When you’re first starting out, it’s helpful to start by drawing the characters as basic shapes. For example, Naruto’s head can be drawn as a circle, his torso as a rectangle, and his legs as two triangles.
This will help you to get the proportions of the character correct before you start adding details.
Use Reference Images
Reference images are your best friend when you’re learning to draw Naruto characters. There are tons of reference images available online, so you should be able to find one for any character you want to draw.
Use the reference images to help you with the proportions of the character, the details of their clothing and hair, and their poses.
Practice Regularly
The most important thing is to practice regularly. The more you draw, the better you’ll become at it. There are many different ways to practice, so find what works best for you. You can draw from reference images, try to draw from memory, or even just doodle. The more you practice, the better you’ll become at drawing Naruto characters.
Here are a few additional tips for drawing Naruto characters:
Pay attention to the details of the characters’ eyes. The eyes are one of the most important features of a Naruto character, so make sure you get them right.
Use different line weights to create depth and dimension. Thicker lines will make your drawing stand out more, while thinner lines can be used for details.
Don’t be afraid to experiment with different colors and shading. Naruto is a very colorful anime, so don’t be afraid to experiment with different colors and shading to create your own unique style.
Examples of Naruto Characters
Some of the most popular Naruto characters to draw include:
- Naruto Uzumaki
- Sasuke Uchiha
- Sakura Haruno
- Kakashi Hatake
- Itachi Uchiha
- Madara Uchiha
- Minato Namikaze
- Obito Uchiha
- Hinata Hyuga
- Shikamaru Nara
Once you’ve mastered the basics, you can start to experiment with more complex poses and expressions. You can also try drawing characters from different angles and perspectives. With practice, you’ll be able to draw any Naruto character you can imagine.
Related Post: Why am I Getting so Many Friend Requests on Facebook?
Conclusion
Now that you have successfully understood how to draw Naruto Uzumaki. Remember to practice and refine your technique to improve your drawing skills. Have fun creating more of your favorite anime characters!
FAQs
Masashi Kishimoto
Sasuke.
Naruto Uzumaki, the Seventh Hokage of the Hidden Leaf Village
References
- easydrawingguides.com/how-to-draw-naruto/
- goodreads.com/how-to-draw-naruto
- drawinghowtodraw.com/howtodraw-naruto
- amazon.sg/How-Draw-Naruto-Sketching-Characters/