Whether you’re an aspiring artist, a seasoned illustrator, or simply looking for a creative way to spend your time, mastering the art of drawing a horse can be a fulfilling and exciting endeavor.
Horses are majestic creatures, and capturing their grace and power on paper is a rewarding experience.
In this comprehensive guide, we will walk you through the intricacies of equine sketching, providing you with expert insights, step-by-step instructions, and answers to common questions to help you become a proficient horse artist.
Table of contents
Getting Started: How to Draw a Horse
Selecting the Right Materials
Before diving into the world of equine sketching, it’s crucial to gather the right materials. To draw a horse, you’ll need:
- Drawing paper or sketchbook
- Pencils (2H, HB, 2B, 6B)
- Erasers (kneaded and gum)
- Blending tools (tortillon or blending stumps)
- Reference images of horses
Understanding Horse Anatomy
A fundamental aspect of drawing horses is understanding their anatomy. Familiarize yourself with the basic skeletal structure, muscle groups, and proportions of a horse. This knowledge will help you create more realistic and anatomically accurate drawings.
You can read this: How to Draw a Fox Full Body: Artistic Endeavors
Sketching the Outline
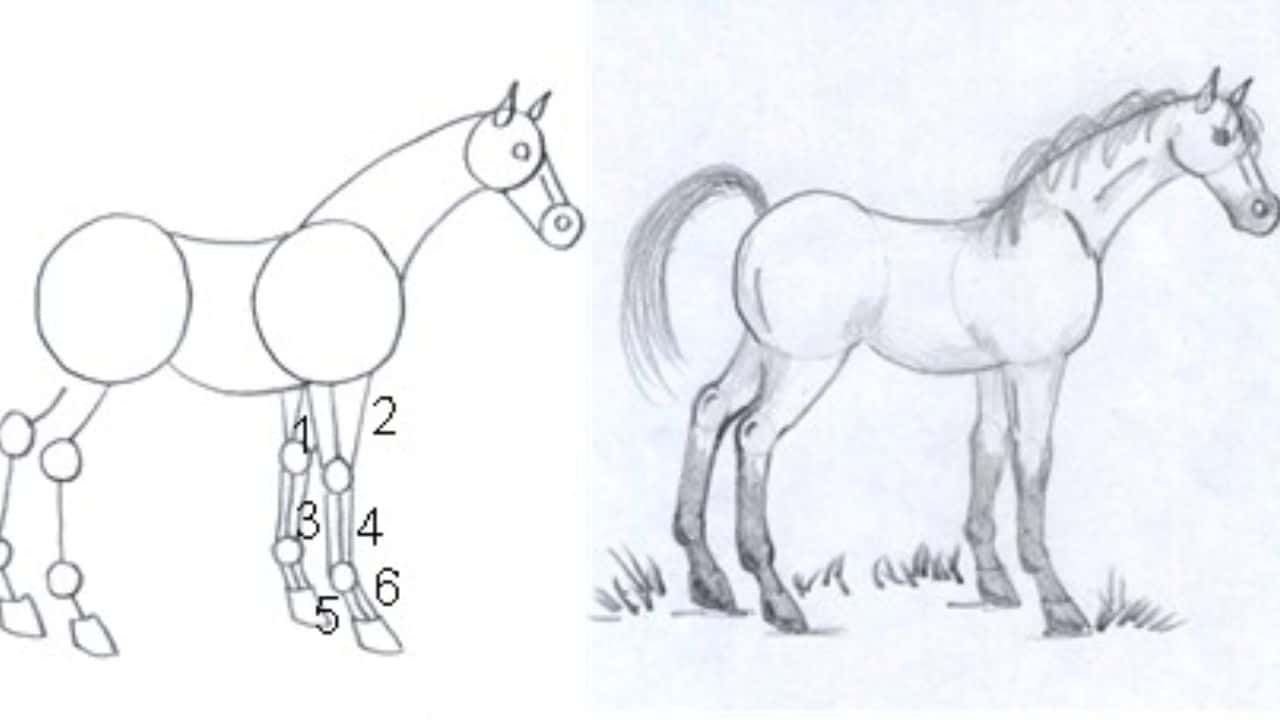
Begin by lightly sketching the basic shape of the horse. Pay attention to the head, neck, body, and legs. Ensure that you get the proportions right. It’s often helpful to use simple geometric shapes to outline the body.
Adding Details
As you progress, start adding details such as the horse’s eyes, mane, tail, and hooves. Pay close attention to the horse’s expression, as it can convey its character and mood.
Shading and Texturing
Shading is a crucial element in creating a realistic horse drawing. Use different grades of pencils to add shadows and highlights. Pay attention to the play of light on the horse’s body and apply shading accordingly.
Final Touches
Once you’ve added all the necessary details and shading, take a step back and evaluate your drawing. Make any necessary adjustments, erase any unnecessary lines, and refine your work to perfection.
Also, read this: How to Draw a Pumpkin: Artistic Tips for Autumn Illustrations
How to Draw a Standing Horse for Kids
Drawing a standing horse is a great way for kids to practice their basic drawing skills and capture the essence of these majestic animals.
- Start with Basic Shapes: Begin by sketching the basic shapes that make up the horse’s body. Draw a large oval for the body and a smaller oval for the head. Add two circles for the eyes and a curved line for the mouth.
- Add Legs and Tail: Extend four lines from the body to create the legs. Horses have long, slender legs, so make sure to capture their elegance. Don’t forget to add a long, flowing tail at the back.
- Define the Details: Now, refine the head by adding the ears and a distinct mane. Draw the hooves at the bottom of the legs. Make sure to include the horse’s graceful features.
- Finish with Details: To complete your standing horse, add a mane, tail, and any additional details you like. Don’t forget to erase any unnecessary lines, leaving behind a clean and polished drawing.
How to Draw a Horse Laying Down
Drawing a horse in a lying-down position can be a fun challenge for kids, and it allows them to explore different poses and proportions. Here are the steps.
- Start with the Pose: Begin by drawing the basic shape of the horse’s body in a lying-down position. Remember to keep it proportional and balanced.
- Outline the Head: Add the head, complete with the eyes, ears, and mane. Horses often have their legs folded under them when they lie down, so ensure to depict this accurately.
- Add Details: Refine the legs and hooves. Don’t forget the tail and the subtle details that make a horse’s body so unique.
- Final Touches: To finish, add shading to give your drawing depth and dimension. This will make the horse appear more three-dimensional and realistic.
You can check this: How to Draw Stitch: Bringing Lilo’s Alien Friend to Life on Paper
How to Draw a Baby Horse
Drawing a baby horse is a delightful experience, as they can capture easily their cuteness on paper. So, here are the steps on how to draw a baby horse.
- Start with a Smaller Body: Begin by drawing a smaller oval for the baby horse’s body. Baby horses, also known as foals, have more delicate features.
- Draw a Cute Face: Add the head with big, expressive eyes, and a small, adorable mane. Baby horses have a sweet and innocent look.
- Add the Details: Outline the legs and hooves. Baby horses often have slightly wobbly legs, which you can depict in your drawing.
- Finish with Charm: To complete your baby horse, add any additional features that make it look charming. Remember to add a fluffy tail and erase any extra lines.
How to Draw a Horse Jumping Up
Drawing a horse in mid-jump is a thrilling exercise for young artists, and it allows them to experiment with capturing movement. Here are steps on how to draw a horse jumping up.
- Begin with Action: Start by drawing the horse in mid-jump. Capture the energy and excitement of the moment with a dynamic pose.
- Outline the Body: Add the body, head, and powerful legs of the horse. Horses jump with strength and grace, so ensure to convey this in your drawing.
- Detail the Features: Define the eyes, ears, and mane. Horses jumping often have their tails up, so include that as well.
- Final Flourish: To finish your jumping horse, add shading to create a sense of motion and height. This will give your drawing a sense of realism and action.
Also, check this: How to Draw a Fairy Easy | Simple Guidelines to Initiate
FAQs
To make your drawing more realistic, focus on achieving accurate proportions, study horse anatomy, and practice shading and texturing.
Yes, you can use short, flowing lines to depict the horse’s mane and tail, giving it a sense of movement and volume.
Practice regularly, study horse anatomy, and use various references, including photographs and real-life observations.
Absolutely! Adding color can enhance the realism of your drawings. Use colored pencils or watercolors to bring your horse to life.
Becoming proficient varies from person to person, but with consistent practice and dedication, you can see a significant improvement in a few months.
You can find reference images in books, online image banks, or even by visiting local stables and horse farms.
Conclusion
Drawing a horse is a challenging but rewarding skill that allows you to capture the beauty and majesty of these remarkable creatures.
With the right materials, a solid understanding of horse anatomy, and practice, you can create stunning equine drawings that showcase your artistic talents.
Keep exploring, experimenting, and perfecting your technique, and you’ll be well on your way to becoming a proficient horse artist.