Today, versatility is key, and sometimes you may find yourself needing to save a Word document as a picture. Whether it’s for sharing snippets on social media, creating visually engaging content, or preserving a document’s formatting, the ability to convert text to an image is a handy skill.
Before we get into all you should know, you may wonder why you might want to save a Word document as a picture. Imagine you’ve crafted a beautifully formatted document, and you want to showcase a section of it on your website or share it on social media. Saving it as an image allows you to maintain the layout, fonts, and colors, ensuring your message remains visually consistent and attention-grabbing.
In this guide, we explore a straightforward guide on how to transform your Word documents into picture-perfect images, adding a touch of visual flair to your content.
Table of contents
What can I use to save a word document as a picture?
To save a Word document as a picture, you can use several methods, depending on your preferences and the specific requirements of your document. Here are three common approaches:
Take Screenshots:
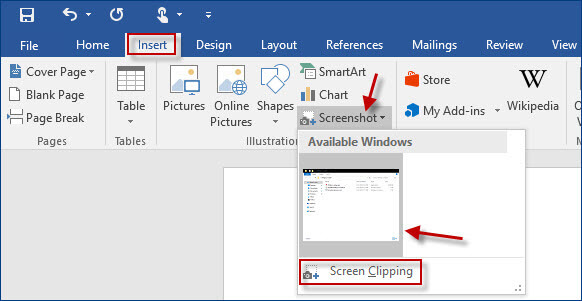
How to do it:
- Open your Word document.
- Display the section or page you want to capture.
- Use the built-in screenshot tool on your computer or a third-party tool.
- Capture the visible area, save the screenshot as an image file (JPEG or PNG), and choose the desired quality.
Pros:
- Quick and straightforward.
- Preserves the visual layout.
Cons:
- May not be suitable for lengthy documents.
- Formatting may vary based on the screen resolution.
You should read: Work-Study in UK: 5 Types of Visa to Apply For in 2023
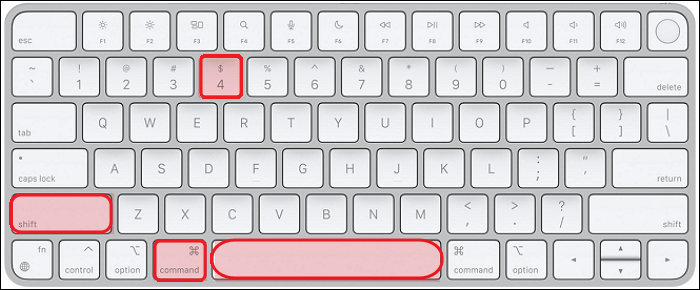
Use Snipping Tool (Windows) or Shift + Command + 4 (Mac):
How to do it:
- Open the Snipping Tool on Windows or use the screenshot shortcut on Mac.
- Select the area you want to capture.
- Save the captured snippet as an image file.
Pros:
- Allows precise selection of the capture area.
- Built-in tools on both Windows and Mac.
Cons:
- Limited to capturing visible portions of the document.
- Multiple captures may be needed for longer documents.
Online Converters:
How to do it:
- Use online conversion tools like “online2pdf.com” or “smallpdf.com.”
- Upload your Word document and choose the output format (JPEG or PNG).
- Download the converted image.
Pros:
- Can handle longer documents.
- No need for additional software.
Cons:
- Requires an internet connection.
- Quality may vary based on the conversion tool.
Choose the method that best suits your needs and workflow. For preserving formatting and layout, consider adjusting your document’s page size before using the screenshot or snipping tool methods.
You should read: Work-Study in UK: 5 Types of Visa to Apply For in 2023
How to Save a Word Document as a Picture?
Saving a Word document as a picture involves a few steps, and the method may vary based on your preferred approach. Here is a step-by-step guide for two common methods:
Method 1: Using Screenshots (Windows or Mac)
Step 1: Open Your Word Document
Open the Word document you want to save as a picture.
Step 2: Display the Content
Navigate to the specific page or section you want to capture as an image.
Step 3: Take a Screenshot (Windows)
On Windows, you can use the Snipping Tool or Snip & Sketch.
For Snipping Tool:
Open the Snipping Tool.
Select “New” and choose the area you want to capture.
Save the captured image.
Or
Step 3: Take a Screenshot (Mac)
On Mac, use the Shift + Command + 4 shortcut.
Press Shift + Command + 4.
Drag to select the area you want to capture.
Release the mouse button to take the screenshot.
Step 4: Save the Image
Save the captured image in a location of your choice, choosing the file format (JPEG or PNG).
Also see this: Fully-funded Commonwealth Masters Scholarships in the UK 2023 [Updated]
Method 2: Using Online Converters
Step 1: Select an Online Converter
Choose an online converter such as “online2pdf.com” or “smallpdf.com.”
Step 2: Upload Your Word Document
Upload your Word document to the online converter.
Step 3: Choose the Output Format
Select the output format as JPEG or PNG, depending on your preference.
Step 4: Convert and Download
Initiate the conversion process and wait for the tool to process your document.
Download the converted image to your computer.
Tips:
Adjust Document Formatting:
Before capturing the screenshot, ensure that your Word document is formatted as desired. Adjust page size and layout for optimal results.
Consider Lengthy Documents:
For longer documents, online converters may be more convenient. Screenshots are ideal for capturing specific sections.
Check Image Quality:
Review the image quality after conversion. Adjust settings if needed to ensure clarity and readability.
Choose the method that aligns with your workflow and meets your specific requirements. Both approaches provide a quick way to transform Word documents into image files.
Read also: Ultimate Guide to Low-flow Toilets
Can I maintain the document’s formatting when saving as an image?
Saving a Word document as an image may not perfectly maintain all the document’s formatting, and it largely depends on the method you choose. Here’s an overview of how different methods handle formatting:
Screenshots:
Pros:
- Quick and easy.
- Preserves the visual layout to a certain extent.
Cons:
- Limited to capturing what is currently visible on the screen.
- Formatting may be affected by screen resolution.
Snipping Tool (Windows) or Shift + Command + 4 (Mac):
Pros:
- Allows for precise selection of the capture area.
- Preserves the selected area’s formatting.
Cons:
- Limited to capturing visible portions of the document.
- Multiple captures may be needed for longer documents.
Online Converters:
Pros:
- Can handle longer documents.
- Preserves a reasonable amount of formatting.
Cons:
- The degree of formatting preservation may vary.
- Complex formatting elements may not be accurately represented.
Tips for Maintaining Formatting:
Adjust Page Size:
Before capturing screenshots or using online converters, adjust the page size of your Word document to match the dimensions you desire for the image. This can help maintain a consistent layout.
Use High-Quality Screenshots:
When taking screenshots, use high-quality settings to capture more details. This can improve the visual fidelity of the saved image.
Consider PDF Conversion:
Instead of saving as an image, consider converting your Word document to a PDF file. PDFs often preserve formatting more accurately. You can then use a PDF to image converter if an image format is required.
Check Online Converter Options:
When using online converters, explore the options provided by the specific tool. Some converters may offer settings or options to enhance the preservation of formatting.
While saving a Word document as an image might not maintain every formatting detail, these tips can help you achieve a satisfactory result based on your specific needs. Experiment with different methods and settings to find the approach that best aligns with your document’s formatting requirements.
Check out this related content: Top 24 inspirational sports movies of all Time
How do I save a Word document as a JPEG in Windows?
Microsoft Word doesn’t have a built-in feature to directly save a document as a JPEG. However, you can achieve this by taking a screenshot of the document and saving it as a JPEG file. Here’s a step-by-step guide for saving a Word document as a JPEG in Windows using the Snipping Tool:
Method: Using Snipping Tool
Step 1: Open Your Word Document
Open the Word document you want to capture as an image.
Step 2: Open the Snipping Tool
Press the “Windows” key, type “Snipping Tool,” and open the Snipping Tool application.
Step 3: Select the Snip Type
In the Snipping Tool, click on “New” and choose the type of snip you want (e.g., Rectangular Snip).
Step 4: Capture the Document
Use your mouse to select the area of the Word document you want to capture.
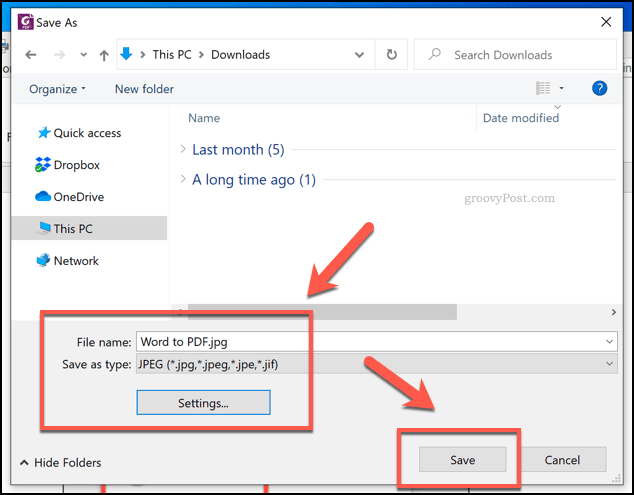
Step 5: Save as JPEG
Once you’ve captured the desired area, click on “File” and then “Save As.”
Choose a location to save the file, select “JPEG” as the file type, and give your image a name.
Click “Save.”
Note: If you’re using a newer version of Windows that includes the Snip & Sketch tool, you can use that instead of the Snipping Tool for capturing screenshots.
Remember, this method captures a screenshot of the visible area on your screen, so it’s ideal for smaller sections or individual pages of your Word document. If your document is lengthy, you may need to capture multiple screenshots and stitch them together using an image editing tool.
If there have been changes or updates to Windows features or applications after my last knowledge update, please refer to the latest Microsoft Word and Windows documentation for the most accurate and up-to-date information.
Read also: What Is PU Leather, and Is It the Real Deal?
How do I save a Word document as a PNG?
Microsoft Word does not have a built-in feature to directly save a document as an image file, including PNG. However, you can capture a screenshot of the document and save it as a PNG. Here’s a step-by-step guide for saving a Word document as a PNG using the Snipping Tool in Windows:
Method: Using Snipping Tool
Step 1: Open Your Word Document
Open the Word document you want to capture as an image.
Step 2: Open the Snipping Tool
Press the “Windows” key, type “Snipping Tool,” and open the Snipping Tool application.
Step 3: Select the Snip Type
In the Snipping Tool, click on “New” and choose the type of snip you want (e.g., Rectangular Snip).
Step 4: Capture the Document
Use your mouse to select the area of the Word document you want to capture.
Step 5: Save as PNG
Once you’ve captured the desired area, click on “File” and then “Save As.”
Choose a location to save the file, select “PNG” as the file type, and give your image a name.
Click “Save.”
Note: If you’re using a newer version of Windows that includes the Snip & Sketch tool, you can use that instead of the Snipping Tool for capturing screenshots.
Keep in mind that this method captures a screenshot of the visible area on your screen, so it’s suitable for smaller sections or individual pages of your Word document. If your document is lengthy, you may need to capture multiple screenshots and combine them using an image editing tool.
If there have been changes or updates to Windows features or applications after my last knowledge update, please refer to the latest Microsoft Word and Windows documentation for the most accurate and up-to-date information.
Read also: How to Use a Coping Saw
Conclusion
The ability to save a Word document as a picture opens up new possibilities for content creation and sharing.
Whether you’re crafting social media posts, creating presentations, or simply preserving a document’s visual appeal, these simple steps empower you to transform your words into striking images with ease.
FAQs
While Word itself doesn’t have a built-in feature to save an entire document as one image, you can capture screenshots or use third-party tools to convert pages into image formats like JPEG or PNG.
Simply take a screenshot of the section you want to save. Use the “Snipping Tool” on Windows or “Shift + Command + 4” on Mac to capture the specific area and save it as an image file.
Yes, there are several online converters available. Websites like “online2pdf.com” or “smallpdf.com” allow you to upload a Word document and convert it to various image formats.
Converting to an image may not retain hyperlinks or editable text, but it preserves the visual layout. Ensure your document is formatted as you want it before converting.
To ensure a high-resolution image, consider adjusting your document’s page size to match the desired image dimensions. Then, take a screenshot or use a tool that allows customization of the output resolution.
References
- adobe.com– How to Save a Word Document as a Picture
- indeed.com– How to Save a Word Document as a Picture
- turbofuture.com– How to Save a Word Document as a Picture